Tuesday, February 16, 2010

Bejeweled

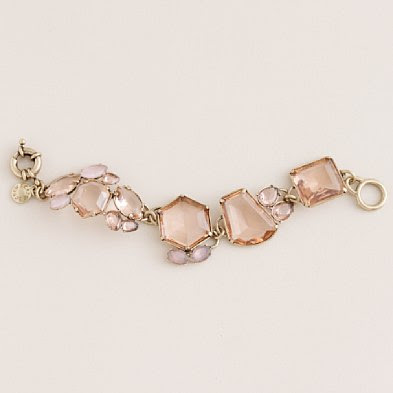
Topping my list of bridal attire to do's is jewelry.  I began looking for jewelry a couple of months ago and purchased something I really loved. I was going for a vintage look and picked this set up.


I ordered them online when J.Crew had an extra 20% off and waited patiently for the postman to bring them to me.  I checked the tracking number everyday to see where my little goodies were. They slowly made their way across the U.S. and arrived at my doorstep. They were packaged in these cute silver J.Crew boxes.  I excitedly tried them on, loved them and packed them carefully back into their boxes. A month later, I decided I should try them on with my dress just to make sure I looked fantastic. 

I put everything on and... I hated it. It was something about my skin tone with the pinkish jewels that didn't look right.  I bagged them up and reluctantly took them back to J.Crew (but I kept the cute silver boxes. Shhh, don't tell!).

I've been looking at these two pieces, but I'm not sure if I LOVE them yet. I ordered them and am waiting for the postman to stop by for a visit again.

Have you found the jewelry you'll be wearing for your wedding day? Are you buying new jewelry? Using jewelry you already have? Borrowing jewelry?

In Love with More Than One

I already bought my wedding dress. I went to six shops within two weeks and found a dress I really loved. I didn't have that "a-ha moment" where I just knew I had found the dress of my dreams. I seldom shop like that. I usually find several things I love and then have to choose between them and I did the same when it came to my wedding dress. I was on a pretty strict budget. While several of my friends were spending up to $5,000 on their dresses, I had budgeted $1,000....including alterations. You can imagine how that really limited my choices.  But, I'm a deal finder and I just knew I could find a dress I loved within my budget. 

At the end of those two weeks, I found the dress (sorry kids, you're going to have to wait for the wedding photos before I post my dress on the Internet for the world to see). It came in under budget too.  

However, since then, I've been watching Say Yes to the Dress, reading blogs and seeing gorgeous dresses. I'm not unhappy about my dress. Quite the opposite, in fact. I can't wait to wear it.  BUT, I want another dress. Can't I wear two? Heck, three? People change during the reception right? I know, it's generally into something completely different like a shorter, more comfortable dress or a traditional cultural dress (which I'm totally not doing. I spent the most money I've ever spent on one item of clothing. I'm not about to wear it for only one hour of my life).  

I'm just being greedy, but indulge me.  If I could wear a second dress, these would be a few of my options.


I guess I can say I love my dress MORE since I chose it over these other options, but I love these too. What can I say? I'm a floozy. Did you fall in love with more than one dress?

Monday, February 15, 2010

All the Small Things

Here's one of those things that I like to do and people shake their heads at me for wasting time on unnecessary work. *Shrug* It's all in the details.


So...if you're one of my BM's and you are reading this, this is a spoiler.  Go back to what you were doing.
For the BM gifts, I wanted to do a little day of survival kit. Not a novel idea, I know, but I love themed gifts and baskets so I thought I'd do one for the ladies. I started off with a cute monogrammed tote bag from Land's End and so far it's stuffed with a pair of flip flops, a thank you card and a Starbucks giftcard. In addition to that, I'm going to put together a few items that they might need like blotting sheets, bobby pins, Q-tips (my favorite eye makeup cleaner-upper when you've had a long day and your makeup is beginning to melt off your face), mouthwash, gum etc. I'm going to put it together in a cute little something that has not yet been determined. 


But, as I was shopping for a couple of these items, I thought, "they won't need 50 Q-tips or 50 blotting sheets. They'll really only need a few."  In fact, I'd be wasting a bunch of money that could go towards their other gift (that is also yet to be determined), if I could buy ONE pack of Q-tips and ONE pack of blotting sheets and split it up.


So, that's just what I did. I took them home and decided I'd figure out a way to split it up. I just needed a way to package these goodies up. So, I pulled out my x-acto blade and self-healing cutting mat and got to work. Sometimes, when I craft, I don't really have a plan except for what kind of paper I want to use and what I want to make. I don't really do a lot of measuring before. I envision what it should look like and measure as I go using my handy dandy Disney ruler (did I mention I love Disneyland?) and the grid on my cutting mat. So, I decided 8 Q-tips would be enough and cut out an envelope shape around it. All personal photos (I will add "take a photography class" to my ever-growing to-do list).


The dotted lines are where you'd need to score a line to help make a nice fold (Hint: Use a tongue depressor or popsicle stick and run it across your crease to make a crisp, flat fold).  Make all four scores and all four creases. 


Reopen and only fold down the top envelope flap (on the left in this photo) and bottom flap/back panel (on the right in this photo) of the envelope. I'm using a Q-tip here to determine where I should cut a line to tuck the top flap in and keep the envelope shut. Mark where you will begin and end the cut. 


Make sure that when you make the cut, you line it up with a ruler or on your cutting mat so that your cut is straight and not diagonal (unless you want it that way!). 


Place ZIPS along the top edge and side of the tab. They're clear, super sticky and can be purchased at Michael's with your 40% off coupon.  I've tried other brands before too, but sometimes the less expensive brands tend to not be as sticky. Fold the bottom panel over the tabs with ZIPS. 
Voila!  Notice that I cut a V into my back panel. I was going to leave it straight, but if I left it straight, you wouldn't be able to access the Q-tips as easily. If you choose to cut a V in, you need to make sure that you cut it before you begin putting ZIPS on your tabs. Also, make sure that your V covers the tabs that they're adhered to.


Insert Q-tips and tuck the top flap into the cut you made to keep it shut.


I did something similar for the blotting sheets. I bought the Clean and Clear blotting sheets from Target. This is the shape of the paper before it's assembled with the blotting sheet in the center as reference. To assemble, use zips on the bottom side of the tabs and adhere into the middle panel (without the blotting sheet there obviously).  The top flap inserts into the line. 


So that there's an easy access point to the blotting sheets, I use my circle punch to cut a half circle. Then insert blotting sheets. It takes a bit of tapping and shaking to get it to fall in and look neat.


So again, totally not necessary, but totally something that I would take the time to do. I plan to use letter stamps to stamp the name of what's inside the little packet/envelope. Did you spend time on something that really didn't matter that much just because you wanted to?

The Invitations Revealed

Here they are, making their Weddingbee premiere...


(personal photo)

Some of you may have seen my previous post about cards I made. I DO plan to handmake thank you cards and gift card holders for our bridal party and helpers. However, as much as I would've loved to handcraft 250 invitations, I realized I just wouldn't have the time to. We do plan to do some DIY items for our wedding, but invitations weren't one of them.

So as I previously posted, we set off on our invitation journey.  Mr. Lace and I didn't want to kill a million trees for our invitations and we were looking for a way to save money since our venue and catering were so expensive.  We decided we wanted to do everything online and only send a one card invitation to our friends and family. Since we were already doing something untraditional, we decided to do something a little different with our invitation.  Our graphic designer was totally game for our offbeat idea and ran with it.

We planned to capitalize on our professions and chose an apple and tow truck as clip art. We wanted to tell the story of how we met on one side with arrows, boxes and other wingdingy things.  On the back, we'd have all the details including our wedding website.

We wrote the text and he designed. Many revisions and e-mails later, our invitation was ready to be printed.  Our graphic designer, Darren, is young, modern and so creative that we knew he'd be perfect for the job.  He was so awesome, worked with our vision and made suggestions that we ended up loving.  Mr. Lace and I are usually pretty busy so we had an initial meeting was at the Bucks and the rest of the time he was willing to communicate via e-mail and PDF attachments. He made the invitation process so easy.

In addition to that, we ordered a personalized rubber stamp on Etsy for the return address as well as black envelopes at Action Envelope.  We stamped our return address on the back of the black envelope in white ink.  I printed the tags on Word and adhered them to the front of the envelope with my favorite crafting paste Yes! paste.  

(personal photo)


(personal photo)
In the empty white box, we stamped the return date in green ink thanks to my MOH's awesome magnetic stamping kit. 

I love, love, love receiving full blown invitations with the RSVP card and all, but between the budget and our love of Earth, we decided against it. So, from a bride who has done it, let me weigh the pros and cons for you.

PROS:
1. This was fun to design.
2. We liked that people were surprised by our invitation. It was pretty well-received by friends and family.
3. We could use a regular stamp to mail these bad boys off. International stamps were only 98 cents.
4. We didn't have to spend an arm and a leg on invitations that would more than likely end up in the recycling bin (or trash) after the wedding was over.
5. We got all the information we needed to send out on one piece of paper rather than five.

CONS:
1. A couple people have said, "Thanks for the save the date" and I've had to gently remind them that this was it and they should visit the website to RSVP. 
2. Non-Internet saavy guests may not know how to get onto the website, but we've enlisted Internet saavy family members that will RSVP for them.
3. A few of our older Asian guests were a little disgruntled about BLACK envelopes. I personally loved them.

How did your invitations turn out? Are you trying something a less traditional?

Sunday, February 14, 2010

Then I Will Do it Myself Part 2

I previously posted about all these beautiful sashes that I love, but am not willing to spend hundreds of dollars on.  I buckled down and began looking at different flowers at shops. Flowers on belts, shirts, headbands, clips, fascinators, cardigans, dresses and shoes.  I knew I had to just sit down and try to make some flowers and see how they turned out. I bought some fabric (with my 40% off coupon at JoAnn's), pulled out my sewing supplies and got to work. Here's what I came up with. Oh yes, and in case you were wondering who took these awesome photos with doubly awesome backgrounds (rose colored carpet anyone?), it was me!


I made a flower stencil using cardstock and pinned it to the fabric. I cut out a LOT of flowers. You'll know when to stop when your hand starts to throb. I suggest using a pair of good fabric scissors. The ones I have are Fiskars microtips (don't forget your JoAnn's 40% off coupon).  You need 6-10 flowers depending on how full you want your bloom to look. Thread a needle and knot it.

Fold one flower into fourths. It doesn't have to be particularly neat. String it onto your needle.

Do this with all your flowers. In this photo, I have six flowers. I arranged four on the bottom and two on top. Arrange them until you are happy with the way it looks.

Put a couple of stitches through the flower to secure all the petals.

I didn't buy any beads or pearls or other bling to put in the middle yet so I whipped out my box of buttons and such that I collect from my clothes. That's right...Ahiru No Pekkle. That's vintage right there!

Black center like an anemone?

With some bling?


I made 10. I bought monogrammed tote bags as a part of my BM and flowergirl gifts so I'm going to make these into pins and attach them onto their bags after I figure out what kind of beads to use as the center.

I'm still experimenting with different fabrics and flower styles to find a good combination for my sash. Many of my flowers are in green only because it was the most inexpensive fabric I purchased and I bought a lot of it, so it ended up being my guinea pig fabric. For my sash and fascinator, the flowers will be made in ivory.

The Gardenia

The Twisted Bloom


The Rose

The Dahlia

Help hive! Which flowers should I keep? Which should I ditch?

Monday, February 1, 2010

Props


Does anyone remember Drew Carrey's show Whose Line is it Anyway? I seldom watch TV, but it was one of my favorite shows in college. My favorite segment? Props! Go check it out on YouTube.

Props seem to be pretty popular for wedding photos nowadays.  The classic balloon with the guy jumping up in the air like he's flying and the girl holding him down.  The happy couple on bicycles.  The shoe shot from the waist down.  For our engagement photos, we didn't really plan to use any props. We brought a change of clothes and picked two awesome locations for our photos.  I think it turned out pretty well since our backgrounds were interesting enough.

However, ever since our engagement photos, I've been thinking about having props for our wedding day photos.

Love this photo since we may be using green apples in our decor.  I don't want to pick them up off the floor afterwards though. Assigning that duty to someone else.

I am totally going out to buy new sunglasses.


Mr. Lace and I have to alternate the type of soda we buy because he's a Pepsi guy and I'm a Coke girl.  We're totally doing this one.

I love this one because I LOVE rain and I have a green and white striped umbrella that I can envision in this photo.  Unfortunately, our wedding is in June and although I don't wish rain upon my own wedding, I DO love this.  How about the silhouette of us through the umbrella in the sun?!

Are you going to use props in your engagement or wedding photos?